
Professor Rot says:
Worm composting is the fastest and easiest way to recycle household food waste.
It takes some planning and periodic involvement to sort out the usable compost.
But the rewards are plenty!
|
Worm composting is an easy, efficient way to recycle food wastes into a fine, high-quality compost (worm castings) for your houseplants or garden. It is very popular with children, teachers in grade schools, and anyone who wants the option of a year-round, indoor/outdoor system that requires very little space or effort.
Worm compost is made in a container filled with moistened bedding and redworms. The bedding may consist of moistened shredded newspaper and leaves. Added to that is food waste from the household. Vermicomposting is a natural method for recycling nutrient-rich food scraps without any resulting odor. The worms go crazy over such an ideal living habitat, both eating and reproducing plentifully. The resulting compost, called worm castings, is an excellent soil conditioner for house plants, patio containers and gardens.
 Worm composting reduces the amount of household garbage that goes to the landfill. The bins are entirely rodent-proof. If done properly, whether indoors or outdoors, there will be little or no fruit flies, gnats or odor. Caution should be given to capturing a liquid by-product or leachate, called compost tea, beneath the bin if housed inside. You can ruin a good floor if you don't! Worm composting reduces the amount of household garbage that goes to the landfill. The bins are entirely rodent-proof. If done properly, whether indoors or outdoors, there will be little or no fruit flies, gnats or odor. Caution should be given to capturing a liquid by-product or leachate, called compost tea, beneath the bin if housed inside. You can ruin a good floor if you don't!
WHAT YOU NEED TO GET STARTED
Worm composting is simple and inexpensive. All you need are five basic things: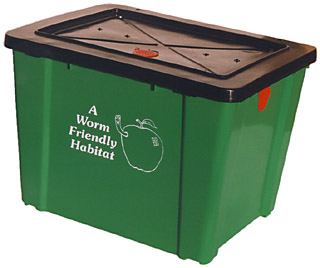
- Container
Purchase a commercially made worm bin, mostly made from plastic. Or, create your own from a plastic storage container easily found at most stores. You may also build one out of wood, or create a worm compost bin out of bricks in your garden. All these types of containers are shown below.
- Bedding
The ideal bedding for worms, believe it or not, is shredded wet newspaper, leaves and moist cardboard. Actually, worms are "night owls" and they don't mind reading the news in small bits! They are the only creatures known to live, eat and poop in their own bed.

- Moisture
A killer for worms is to not have a moist environment. Don't give them moisture and they're out of there! Or else, they will shrivel and die, looking like contorted pretzel sticks.
Give them too much moisture, however, and they will slow down production. Who wants to live in a dark squishy home?
- Worms
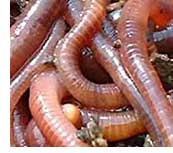
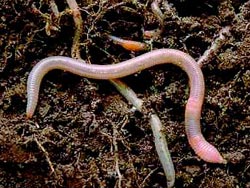
Obviously, you cannot vermicompost without worms, duh! Redworms (also known as red wiggler, brandling or manure worms) are best suited to worm composting because they thrive on organic material, such as food waste. They are often found in aged manure, compost heaps, and piles of leaves. Their official names are Eisenia foetida and Lumbricus rubellus. Dew-worms (you know, the suicidal kind seen on streets or sidewalks after a rainfall), on the other hand, are better suited to life in the soil and shouldn't be used in a worm bin. By the way, about 500-2,000 redworms will do to get your worm bin going in high production.
- Kitchen Scraps
Besides the newspaper, leaves, and cardboard, the worms are really crazy over your food scraps. Don't give them any and they become sad, depressed and sulky. They may even go on strike and refuse to live anymore. So, give them quality food scraps. DON'T give them anything fatty, meaty or the like: nothing you would want to throw into your regular compost pile. They are vegetarians to the max!
WORMS LOVE! |
WORMS HATE! |
Vegetable scraps
Breads and grains
Fruit rinds & peels
Tea bags
Coffee grounds & filters
Crushed egg shells
|
Meat or fish
Cheese (any form)
Butter
Greasy, oily foods
Animal wastes
A "Don't Care" attitude |
HOW TO DO IT
STEP 1: GET YOURSELF A CONTAINER
Get a wooden, plastic, or metal bin with tight-fitting lid. A bin sized 2'Wx4'Lx1'H is good for a 2-3 person household disposing about 8 lbs/3.6kg of food scraps per week. The recommendation is that a container should provide one square foot of surface area for every pound of food waste per week. (Some experts suggest the height to be 8-12 inches, and the length as little as 3-feet.) The bin should have drainage holes on bottom, a bottom catch tray, and air vents on top and sides.
Worms like a moist, dark environment. Their bodies are 75 to 90 per cent water so their body surfaces must be moist for them to breathe. Cover the bin to conserve moisture and provide darkness. Indoors, place a sheet of cardboard, dark plastic or burlap sacking on top of the bedding. Outdoors, use a solid lid to keep out unwanted scavengers and rain.
Worm bins can be located in the basement, shed, garage, balcony or kitchen counter. They need to be kept out of the hot sun, heavy rain and cold. Worms enjoy temperatures between 40°F/4.4°C and 80°F/27°C, with temperatures in the 70s(F) perfect. When temperatures drop below 40°F/4.4°C, bins should be indoors, heated or well-insulated. Additionally, worms like low-traffic and low-noise; so keep that in mind for your indoor location.
Commercially made bins are made out of durable, often recycled plastic. They should have holes in the bottom for drainage of the leachate by-product, as well as screened air vents on top and sides.
You can make your own from a store-bought storage container.
The pictured bin is available at:
Worms.com |
|
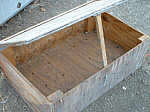
| A wooden bin can be built out of plywood and 2x4s or 2x2s. Size should be around 2'Wx4'Lx1'H. Drill holes at bottom and set on top of drainage lid to catch leachate. |
 |
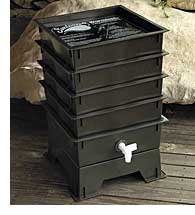
Some commerical worm bins are round or square towers consisting of trays.
The leachate collects in a lower tray and is poured off. Use it like Compost Tea to fertilize plants. |
 |
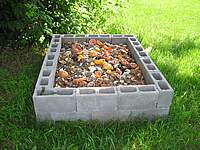
An effective outdoor worm bin can be easily and quickly made from foundation bricks. This is for serious worm composting of copious amounts of food waste.
Caution: keep well-covered for rodent and scavenger protection. |
 |
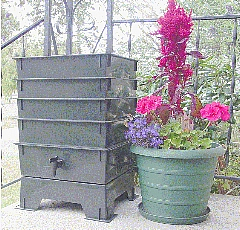
A tower tray worm bin sitting outside in the garden or on a deck is effective.
Caution: Worms like ambient air temperatures above 40°F/4.4°C. Bring the bin indoors during winter. |
 |
STEP 2: ADD MOIST, DRAINED BEDDING TO BIN
The bedding for a worm bin must be able to retain both moisture and air while providing a place for the worms to live. Consider these materials for bedding, and vary the bedding to give the worms more nutrients:
- Shredded newspaper (shredded in strips by hand) and corrugated cardboard (any ink is not a problem)
- Shredded fall leaves (or small whole ones)
- Dried grass clippings
- Seaweed
- Chopped-up straw and other dead plants
- Aged manure
- Peat moss (Caution: peat moss is very acidic and should be well-soaked and combined with other bedding material)
- Commerically prepared worm bedding, available at some sporting goods stores
BEDDING TIPS
- MOISTEN THE BEDDING
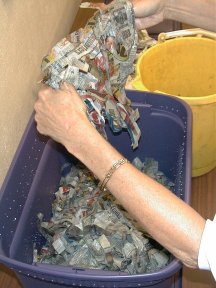
Moisten any bedding with water. This is best done by putting it in a large container, covering it with water so that the bedding material absorbs as much water as possible. Let it soak for several hours or more.
- SQUEEZE WATER OUT OF BEDDING
The resulting consistency of the bedding material should that of a well-wrung sponge.
- FILL THE WORM BIN 2/3 FULL WITH THE PREPARED BEDDING
A 2X3 foot bin will need about 10-15 lbs of bedding. Extra bedding can be stored.
-
FLUFF THE BEDDING
Fluffing (lifting) the bedding is important to create air spaces for aerobic activity, odor control, and to give worms free movement inside the bin.
- MOISTEN BEDDING AGAIN IF NEEDED
Check your worm bin now and then to determine if it needs more moisture. Moisten with a spray bottle or hose nozzle.
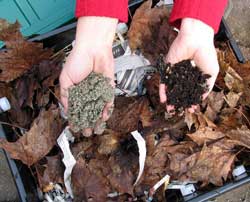 6. PLACE A COUPLE HANDFULS OF SAND AND SOIL AMONGST THE BEDDING 6. PLACE A COUPLE HANDFULS OF SAND AND SOIL AMONGST THE BEDDING
Sand and soil provide grit for the worm's digestion of food.
STEP 3: ADD RED WORMS TO BIN
The worms used in vermicomposting are called redworms (Eisenia foetida), also know as red wigglers, manure worms, red hybrid or tiger worms. Worms enjoy temperatures between 55°F/13°C and 80°F/27°C, with temperatures in the 70's(F) perfect.
Don't make the mistake of using night crawlers out of your yard or compost bin. Wrong kind! These lovely creatures need to tunnel through dirt to eat and survive. They love the cooler temperatures deep in the soil.
WHERE TO GET RED WORMS
 Two good internet sources: Two good internet sources:
Planet Natural and Gardens Alive- From a farmer's stable or manure pile
- Lawn and garden catalogs
- A local bait store (often the fastest and cheapest way to get some while supporting local business!)
HOW MANY WORMS TO GET
Mary Appelhof, author of most popular worm composting guide, Worms Eat My Garbage, recommends two pounds of red worms (about 1,000 wigglers) for every pound per day of food waste. Other experts recommend a one-to-one ratio, or about one pound of worms (500 worms) for one pound of garbage. To figure out how much food waste your household generates, monitor it for a week and divide by seven.
If you start out with less than one pound of red worms, don't worry, they multiply very quickly. Just adjust the amount that you feed them for your worm population you estimate you have.
 Worms multiply quickly! Keep in mind that worms, provided you give them adequate food and a good home, can double their populations every 90 days. It's probably best to start out with slightly fewer worms than you need and just expect that your worm population will increase to fill your demand for processing organic waste. Worms multiply quickly! Keep in mind that worms, provided you give them adequate food and a good home, can double their populations every 90 days. It's probably best to start out with slightly fewer worms than you need and just expect that your worm population will increase to fill your demand for processing organic waste.
To add worms to the bin, simply scatter them over the top. The skin on a worm reacts to light and it will immediately work its way down into the bedding to get away from the light.
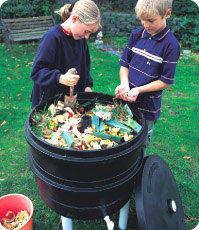
STEP 4: BURY FOOD SCRAPS IN BIN
- Easiest Method
Spread food scraps in a thin layer on top of the moist bedding. The red worms will come to the surface from inside the bedding and eat the scraps or pull them down into the bedding.
-
Orderly Method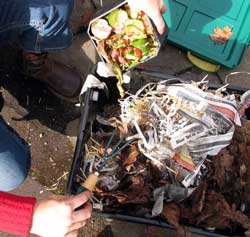
Divide the bin into several imaginary sections. You will bury successive loads of food scraps in each section, most likely over a period of weeks. Simply pull back a small amount of bedding and dump in the scraps. Then cover the scraps with an inch of bedding. Start at one corner of the bin and work your way across the bin. By the time you get back to your first burying location, worms will have composted most of the food scraps.
 TIP: TIP: Worm composting takes a little practice and planning at first. Remember that your bin should provide one square foot of surface area for every pound of food waste per week. For example, a bin 2 feet in width, 4 feet in length, and 1 foot in height would have 8 different sections. If each section gets a pound of food, as recommended, then you will need two pounds of red worms. A common mistake among beginners is having too few worms. One soon discovers that the food scraps in each section are not being eaten fully before additional scraps are put into that section 8-9 days later. Eventually, the worms will multiply and be plentiful for all sections.
- ODOR CONTROL
If you notice odors, cut back on the amount of food or try chopping the food up into smaller pieces. Citrus has a noticeable odor and the peelings are not eaten quickly. In general, worms eat vegetables faster than fruit scraps.
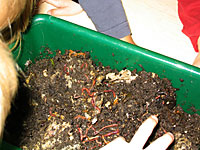
STEP 5: HARVEST
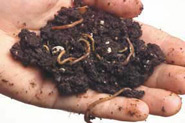
THE AMAZING QUALITY OF WORM CASTINGS
Happy worms in a good home will digest kitchen scraps and bedding faster than any other compost method. The material will pass through the worms' bodies and become worm castings. In about 12-16 weeks, the worms will have digested nearly all the garbage and bedding and the bin will be filled with a rich, black natural fertilizer and soil amendment.
- Worm castings contain five times more nitrogen, seven times more phosphorus and 11 times more potassium than garden soil
- Worm castings are rich in humic acids and improve the structure of the soil
- Worm castings are excellent for potted plants
WORM COMPOST TEA
A natural by-product of worm composting is the production of a liquid leachate, better called Compost Tea. This liquid is nutrient-rich and makes an excellent balanced fertilizer for plants. Make sure your bin has bottom holes (or a spigot on some commercial worm bins), so that the liquid can drain into a drip pan beneath the bin. Otherwise, you could pernanently stain a floor beneath the bin. Raise the bin above the drip pan on small wooden blocks.
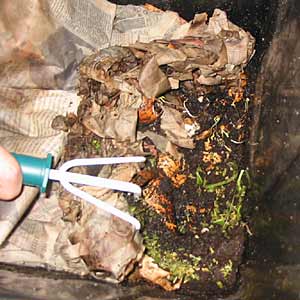
GATHERING THE WORM CASTINGS
To keep your bin going, you will need to remove the castings from time to time and there are several ways to go about it.
- GATHER CASTINGS OFF THE TOP
Shine a bright light into the bin; worms are sensitive to light and will move to the lower layers of the bin. Remove the top layer of casting with your hands. As you remove layers of bedding the worms will keep moving to the bottom of the bin. From the removed bedding, pick out any worms or worm eggs (small, opaque cocoons) and return them to the bin. Refill the bin with fresh layers of moist bedding and scraps to begin the composting process again.
- PUSH CASTINGS TO THE SIDE
Push the black, decomposed material to one side of the bin, and fill the other side with new, moist bedding and kitchen scraps. Wait several days; the worms will migrate to the freshly filled side of the bin and you can just scoop out the finished compost. Pick out any red worms or worm eggs from the removed material and return them to the bin.
- SORT THROUGH CASTINGS ON A TARP
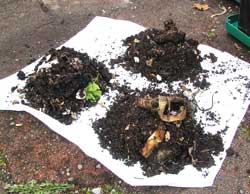
Dump the contents of the worm bin onto a tarp. Sort through the pile, pushing the castings into their own pile. Place the worms in another pile with some leftover castings and undigested bedding and food scraps. Then place the worms and remaining material back into the bin, add moist bedding and start the whole composting process over again.
|


